At my former employer, one of the key components of our Business Intelligence environment was transactional replication of data between production and the Data Warehouse. Because this replication was critical to our reporting/BI pipeline, not to mention my livelihood, I wanted to dig into to how transactional replication works. As usual for me, the first step on this learning journey was to get a playground (aka “lab”) setup on my personal laptop and then dive in with both feet!
In my blog post we will setup transactional replication and practice replicating a table from one database to another. We are going to replicate the dbo.Badges table from the StackOverflow database to small database called SO_small, using SQL Server transactional replication. This article assumes you already have a working SQL Server instance, have a copy of the StackOverflow database (link above) and a desire to learn.

Setup the Distributor and Publisher
For the lab, we will set up all replication components on the same instance. In particular we’ll run a local distributor, which is different from most production environments, as I found out. However the constraints of my home lab dictate this setup.
All our configuration can be done with the wizards. First, select “Replication” folder, and choose “Configure Distribution”:

Now you’ll get the “distributor” screen of the wizard. As mentioned above, choose to have all replication components on the same instance for our walk through:

We’ll choose to have our SQL Server Agent start automatically.

We now need to create the Snapshot Folder for initial seeding of table:
Create folder on DB server
We need a folder to hold the snapshot that will be created. I called mine “sql_replic_share”. Super creative!

For purposes of the demo, just grant folder permissions to the “Authenticated Users” group to get going. NOT RECOMMENDED IN PRODUCTION!

Setup folder sharing on the sql_replic_share. Again for demo, grant “Everyone” read control. NOT RECOMMENDED FOR PRODUCTION!

Now populate “Snapshot Folder” with the correct path to the folder that will hold our initial snapshot and continue:

Configure the Distribution DB:
A distribution database will be created as part of this process and will be visible in the System databases folder. Be sure to choose the location that has the storage you are wanting to use:

As noted, this will create a System Database called “distDB”

Configure publishers. The local instance is Auto filled since we are setting up as a Distributor locally:

Let SQL Server do the distribution configuration:

Verify configuration. If it all looks good, hit Finish:

The wizard should finish successfully:

Setup Publication
We are wanting to replicate the dbo.Badges table FROM StackOverflow to the SO_small database on the same SQL Server instance.
Right click the Local Publications folder under the Replication folder, and choose New Publication:

We want to publish dbo.Badges from the StackOverflow database, so that is our Publication database for this dialog:

We are setting up Transactional Replication, so we will use that type for our Publication:

Our goal is to publish StackOverflow.dbo.Badges, so that is the Article we care about to publish. We are taking all the columns, though we do not have to:

For kicks, we’ll add a filter to our Article, so that we only get the Badges since 1/1/2016. In our case this will speed our queries and conserve space:


Our filter is now populated on the dialog:

Snapshot:
We are now at the step where the initial snapshot of our data will be created. We’ll create ours right away. This is the initial “seeding” of our replicated table in our subscriber database:

For our demo, we are going to run the Snapshot Agent under the SQL Server Agent service account, though usually you want to have a separate account to run each agent:

We’ll create our publication straight away, though you could also have SQL Server create a script for later use:

After hitting next, you’ll be presented with a chance to name your Publication. I chose something descriptive, including the fact that my publication contains a filter:

Hit finish, and if all goes well you’ll be presented with a dialog that reflects success:

Setup the Subscription
Now we’ll setup our subscription. In most real-world environments this subscription would live in a different instance from the Publisher. But this is a demo… so let’s keep it easy:
Expand “Replication”, and then right-click Local Publication and choose “New Subscriptions…”

Since we have but one publication, it is the only one to show in our window. Hit Next to be taken to the Distribution Agent Location dialog:

We will be creating a “push subscription” which is the default. Hit next.

On the “Subscribers” page, we choose our server and the database that will be our subscription database (SO_small):
Now we come the Distribution Agent Security Window. The distribution agent will be responsible for moving data from the distribution to the subscriber databases. So the accounts specified must be able to connect to each

We’ll click the … ellipsis next to the Connection to Subscriber box, and then we will specify the account that will run the Distributor Agent process. Since this is non-production, we’ll go ahead with “Run Under the SQL Server Agent server account”

Takes us back to the screen

We will choose the schedule that the agent will run. We choose “Run Continuously”

Now let’s initialize our subscription with a snapshot. Keep in mind this can take many hours/days depending on the size of the object being replicated. Our table is small, so it takes no time at all. But a table at work took over a day, because it was rather wide and contained several billion rows. So beware of this.

We’ll let the wizard do its work, though you could also generate a script if so desired:


And this is what success looks like:

Or so it seems… however
Gotchas!
I ran into a problem after initially setting up my lab. You might find this useful. After waiting awhile and looking at our SO_small database, no dbo.Badges table showed up in our Subscription database (SO_small)

WTH? Fortunately we have a tool for monitoring replication that is accessible through SSMS. Not surprisingly it is called Replication Monitor (who would have guessed?). Go to the Replication folder in SSMS, right click and choose “Launch Replication Monitor”

We are presented with an application designed to help us figure out what is happening in replication at a given moment:

As we see, there is no shortage of red x’s, an almost universal sign of trouble. Let’s click on that “Agents” tab with the big red X:
Upon clicking the first error in the list on that tab, we see our problem has to do with access to our share that we created to hold our Snapshot:

First thing I’ll try is granting “Full Control” to the Everyone group on the share (again non for production!)
After making the permissions change, right click the line that shows the Error and list Snapshot Agent in the job column. Choose “Start Agent”

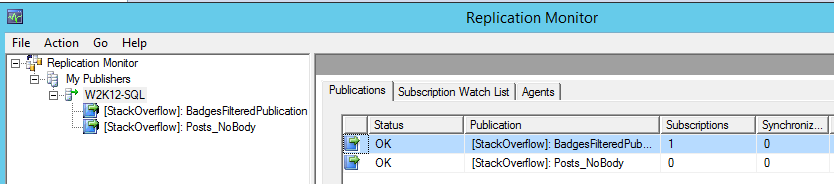
When all is well, our replication monitor view will be gleefully free of the red x’s:

And sure enough, our table is now replicated in the SO_small database!

Add another article to an existing publication
The beauty of this is that it does not require another full snapshot, as long as you don’t change any other article’s properties in these steps. A mini-snapshot will be taken just for the object you are adding to replication in the current publication.
Right click the local publication we created above (BadgesFilteredPublication) and choose Properties:

On the Publication properties page, go to the Articles tab, uncheck “Show only checked articles in the list” and check the box for “Posts (dbo)” under the Objects to publish part of the dialog. Uncheck the “Body” column, as we don’t wish to replicate this NVARCHAR(MAX) column in our demo. Also, note we are leaving “Badges (dbo)” checked, as it is the existing article that is part of this publication. Hit “OK”.

At this point the snapshot agent will run, and generate the needed snapshot into the snapshot shared folder:

When the snapshot is applied, your replicated table will be available in the subscriber database:

At this point you have all the components of replication in place in your environment, and can see data flowing between the StackOverflow.dbo.Badges table and your SO_small.dbo.Badges table. Next post we’ll put this to use! Hope to see you then.

Thanks for finding that mistake! It is now corrected ; )
LikeLike